Auto-restart MariaDB after crash

Open file in nano (or other text editor) from root user:

nano /etc/systemd/system/multi-user.target.wants/mariadb.service

Change parameters in file:

# Restart crashed server only, on-failure would also restart, for example, when
# my.cnf contains unknown option
Restart=always
RestartSec=45s

Restart daemons:

systemctl daemon-reload
systemctl restart mariadb.service

Openwrt and 4G USB Modem Dongle (Huawei) E3372-325

1. Connect to router over ssh and run opkg update

2. Install packages opkg install kmod-usb-net kmod-usb-net-rndis kmod-usb-net-cdc-ether kmod-usb2 kmod-usb3 kmod-usb-net-huawei-cdc-ncm usb-modeswitch kmod-usb-serial usbutils

3. Check modem lsusb:

lsusb openwrt

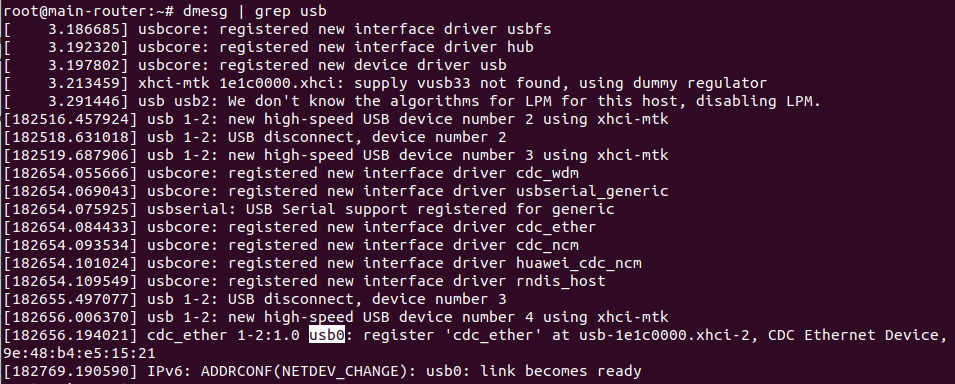
4. Check connection name for modem dmesg | grep usb (for me it’s usb0, somethimes there’s name eth1 and etc.:

modem interface name

5. Create interface in Openwrt Web Panel «Network» — «Interfaces»:

create mobile interface

6. Important! Add new mobile interface in WAN-zone in firewall.

7. After all this manipulation you can see working interface:

working mobile interface

8. And after all these steps, I was able to go to the model control panel at the address of http://192.168.8.1/

Ubuntu 22.0.4 and 4G USB Modem Dongle (Huawei) E3372-325

For 4G USB Modem Dongle (Huawei) E3372-325 — first seconds you can see in lsusb Bus 005 Device 013: ID 3566:2001 Mobile Mobile and after Bus 005 Device 015: ID 12d1:155e Huawei Technologies Co., Ltd. Mobile

Full instruction here https://blog.tanatos.org/posts/huawei_e3372h-325_brovi_with_linux/.

So 2 scripts are below

/usr/local/bin/brovi_switch (make it executable!)

#!/bin/bash
PATH=/usr/local/sbin:/usr/local/bin:/usr/sbin:/usr/bin:/sbin:/bin
# vim: filetype=bash

#   2023-01-28 Pavel Piatruk, piatruk.by

ID=$$

USB_ID=$(basename $DEVPATH)


{
#set|sort 

#ls -la /sys/$DEVPATH

echo bInterfaceClass on ports as follows

grep -H .  /sys$DEVPATH/1*/bInterfaceClass

IC=$( grep -h .  /sys$DEVPATH/*:1.0/bInterfaceClass )

echo "got bInterfaceClass on 1st port $IC"
    echo usb_modeswitch -b $BUSNUM -g $DEVNUM -v 3566 -p 2001

case $IC in
08) 
    echo Storage MODE
    ;;
e0)

    echo "Already RNDIS"
    LOCKFILE=/var/run/brovi.$USB_ID.lock
    if [[ -e $LOCKFILE ]]
    then    
        LOCKFILE_AGE=$(( $(date +%s ) - $(stat  $LOCKFILE -c %Y) )) 
        echo LOCKFILE_AGE=$LOCKFILE_AGE
    fi

    if [[ -n $LOCKFILE_AGE ]] && [[ $LOCKFILE_AGE -lt  10 ]]
    then    echo was switched VERY recently, noop
    else

    set > $LOCKFILE

    CMDS=(
        "usb_modeswitch -b $BUSNUM -g $DEVNUM -v $ID_VENDOR_ID -p $ID_MODEL_ID  -W -R  -w 400 "
        "usb_modeswitch -b $BUSNUM -g $DEVNUM -v $ID_VENDOR_ID -p $ID_MODEL_ID  -W -R "
    )

    i=0

    for CMD in "${CMDS[@]}"
    do
        i=$(($i+1))
        echo "=====STEP$i, run: $CMD"
        $CMD
    done
    fi

    ;;
ff)
    echo Serial Port
    ;;
*)
    echo Unknown mode
    ;;
esac

} | logger -t BROVI

exit 0

and UDEV script /etc/udev/rules.d/40-huawei.rules

ACTION!="add", GOTO="modeswitch_rules_end"
SUBSYSTEM!="usb", GOTO="modeswitch_rules_end"

# All known install partitions are on interface 0
ATTRS{bInterfaceNumber}!="00", GOTO="modeswitch_rules_end"

GOTO="modeswitch_rules_begin"

LABEL="modeswitch_rules_begin"
# Huawei E3372-325
ATTR{idVendor}=="3566", ATTR{idProduct}=="2001", RUN+="/usr/local/bin/brovi_switch %k %p"

LABEL="modeswitch_rules_end"

ImageMagick PDF and JPG useful examples

ImageMagick convert PDF to JPG

Crop, rotate and set jpg quality on multipage PDF to JPG convert:

convert -density 150 -resize 968x -gravity NorthEast -extent 968x692 -rotate "-90" 1.pdf -quality 90 1.jpg


ImageMagick PDF to JPG sometimes results in black background

Need remove alpha in PDF:

convert -density 150 -resize 1000x -fill white -alpha remove *.pdf -quality 90 1.jpg


Bash script with ImageMagick that resize and change qulity a lof of images

#!/bin/bash

if [ -d photos ]; then
	rm -rf photos
fi

mkdir photos

for img in ./*
do
	filename=$(basename "$img")
	filename="${filename%.*}"
	
	convert "$img" -auto-orient -resize 1000x -quality 85% "photos/$filename.jpg"
done;

How to install SSL (Let’s Encrypt) for the HestiaCP admin panel

Сurrent information for 2024 year and later

Need run only one command in terminal for root user in any directory:

v-add-letsencrypt-host

Old instuction:

When you go to panel url with port 8083 — you can see SSL error in your browser.

Here’s what you can do to fix that:

1. If you don’t have WEB domain — add WEB Domain in panel. I will use my domain codebe.com for example.

2. Go to WEB domain edit which one uses for panel:
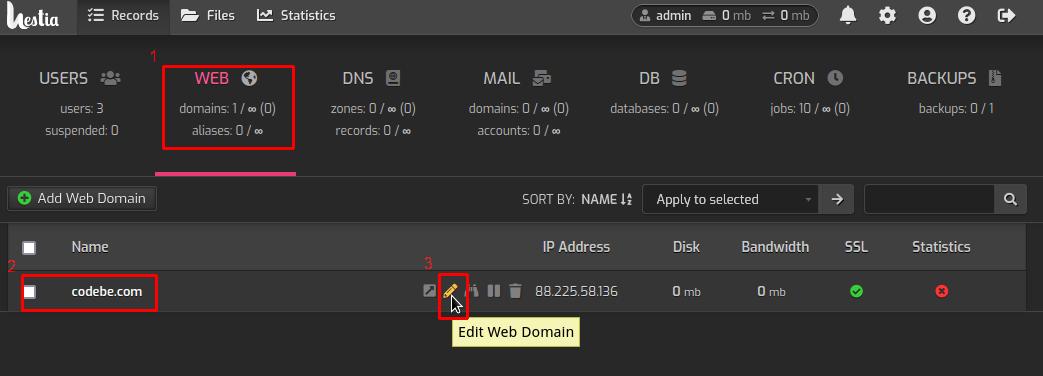
Hestiacp add ssl to panel step 1

3. Enable SSL certificate for domain:
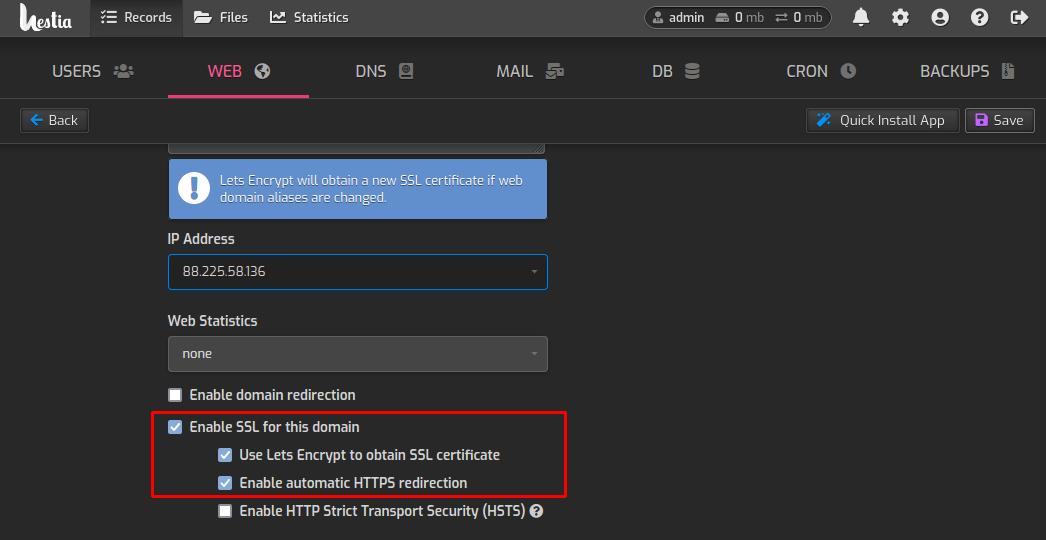
Hestiacp add ssl to panel step 2

4. Connect to your server over SSH.

5. Get information for changing hestia-nginx config. Copy full path to certificate and key for you domain, for example, I have this path:

/home/codebe/conf/web/codebe.com/ssl

And I’ve this files in current directory:

799435-codebe.com.crt
799435-codebe.com.key

6. Open file in your favorite text editor:

/usr/local/hestia/nginx/conf/nginx.conf

7. Change parameters for hestia-nginx server:

....
server {
    ....
    ssl_certificate      /home/codebe/conf/web/codebe.com/ssl/799435-codebe.com.crt;
    ssl_certificate_key  /home/codebe/conf/web/codebe.com/ssl/799435-codebe.com.key;
    ....
}
....

8. Restart HestiaCP (it’s working for Debian 11):

service hestia restart

9. Well done!

Resolve Error (AWS Free Tier and Terraform): Error launching source instance: VPCIdNotSpecified: No default VPC for this user. GroupName is only supported for EC2-Classic and default VPC.

When you use Amazon Free Tier period and want to run free EC2 instance and when you get error:

Error: Error launching source instance: VPCIdNotSpecified: No default VPC for this user. GroupName is only supported for EC2-Classic and default VPC.

You need to create Security Group resource (example for port 80 for http server):

resource "aws_security_group" "allow_http" {
  name        = "allow_http"

  ingress {
    from_port        = 80
    to_port          = 80
    protocol         = "tcp"
    cidr_blocks      = ["0.0.0.0/0"]
    ipv6_cidr_blocks = ["::/0"]
  }

  egress {
    from_port        = 0
    to_port          = 0
    protocol         = "-1"
    cidr_blocks      = ["0.0.0.0/0"]
    ipv6_cidr_blocks = ["::/0"]
  }
}

Mount VirtualBox vdi image (debian, ubuntu)

You can use qemu package.

apt-get install qemu

After you can check and load network block device kernel-module:

rmmod nbd
modprobe nbd max_part=8

Then you connect image:

qemu-nbd -c /dev/nbd0 image.vdi

And mount (don’t forget create mount directory /media/image):

mount /dev/nbd0p1 /media/image

And unmount:

qemu-nbd -d /dev/nbd0